 Ms. Lê Thị Ánh Trinh
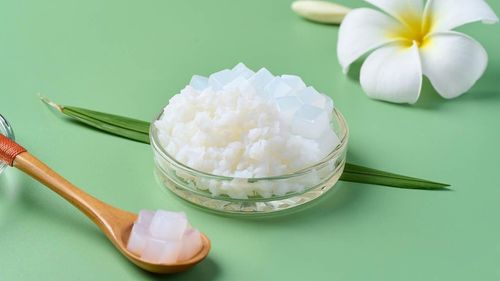
Making nata de coco jelly with grass jelly is simple and requires just four steps: preparing the coconut jelly, cooking the grass jelly, pouring it into molds, and chilling before serving. When done properly, the dessert features a creamy white coconut jelly layer paired with soft grass jelly, creating a refreshing and delightful treat from the very first bite.
1. How to make nata de coco and grass jelly at home
On hot days, nata de coco and grass jelly dessert is a favorite thanks to its light, refreshing flavor and easy-to-enjoy texture. With just about 10 minutes of preparation and 30 minutes of cooking time, you can easily make this delicious treat at home to share with family and friends.
1.1 Ingredients for nata de coco and grass jelly
Before making a batch of nata de coco and grass jelly for four servings, prepare all the ingredients according to the measurements below.
For the tools, you only need basic kitchen equipment such as a gas or electric stove, a pot, mixing bowls, a ladle, and jelly molds.
1.2 How to make a refreshing nata de coco and grass jelly dessert
1.2.1 Step 1: Prepare the coconut jelly layer
First, mix 1.2 liters of fresh coconut water with 300 ml of coconut milk until well combined.
Next, combine 80 g of sugar with the agar powder, then add a small amount of water to help the powder absorb evenly. Gradually add this mixture to the prepared coconut liquid while stirring continuously to ensure the powder dissolves completely.
Place the pot on the stove and cook over medium heat, stirring constantly until the mixture comes to a boil, then turn off the heat.
1.2.2 Step 2: Cook the grass jelly
Prepare the grass jelly according to the instructions on the product packaging (typically by dissolving the powder with water and sugar, then heating until the mixture reaches a slightly thick consistency). During the molding process, make sure both pots of jelly remain warm to prevent them from setting before the layers are formed.
1.2.3 Step 3: Layer the nata de coco and grass jelly
Pour a layer of coconut jelly into the mold, then place it in the refrigerator for about 10 minutes so the surface can lightly set. Next, gently pour a layer of grass jelly on top. Repeat this alternating process until the mold is full.
Tip: To help the layers bond together more firmly, add the next layer while the previous one is still slightly warm rather than fully set. If the jelly mixture in the pot begins to cool and solidify, simply place it back on the stove and warm it gently until it melts again.
1.2.4 Step 4: Chill and serve
Once all the layers are poured, refrigerate the jelly for at least 2 hours so it can fully set, resulting in a firm, chewy, and refreshing texture.
For a more appealing presentation, cut the jelly into bite-sized cubes and serve with nata de coco topping. The combination of smooth grass jelly and chewy coconut jelly creates a balanced and enjoyable texture. The dessert tastes even better when served with ice, a drizzle of rich coconut milk, or a splash of fresh milk for extra creaminess.

The nata de coco and grass jelly recipe above is suggested by GC Food - a high-quality nata de coco manufacturer in Vietnam.
2. Common mistakes and tips when making nata de coco and grass jelly
Although making nata de coco and grass jelly is not complicated, achieving a dessert with a clear appearance, a pleasantly chewy texture, and well-bonded layers can take a bit of practice. Don’t worry if your jelly turns cloudy or the layers separate - these are common issues for beginners. The tips below will help you identify and fix the most frequent problems when preparing this dessert.
2.1 Cloudy nata de coco and grass jelly
Cloudy grass jelly often occurs when the powder is not fully dissolved or has not been soaked long enough to expand evenly before cooking. Cooking over high heat or allowing the mixture to boil too vigorously can also create tiny air bubbles that make the jelly appear cloudy once it sets. In addition, failing to skim off the foam on the surface may reduce the jelly’s clear, appealing appearance.
To avoid this, mix the agar powder with sugar first, then soak it in water for about 15 - 20 minutes before heating. While cooking, keep the heat low, stir gently in one direction, and continuously skim off any foam. Finally, strain the mixture through a fine sieve before pouring it into molds to achieve a smoother and clearer jelly texture once set.
2.2 Nata de coco and grass jelly do not set
Grass jelly that does not set or becomes crumbly is often caused by an incorrect powder-to-water ratio - usually when too much water is used compared to the instructions on the packaging, resulting in a diluted mixture. Another common reason is insufficient cooking time or heat that is too low, which prevents the jelly powder from activating properly and leads to a soft, watery texture after cooling.
If the mixture still looks too thin while on the stove, dissolve a small amount of additional grass jelly powder (or a little tapioca starch or agar powder) in water, then gradually add it to the pot. Stir well and continue boiling for another 3 - 5 minutes until the mixture thickens noticeably. If the jelly has already been poured into molds but fails to set, you can return it to the pot, reheat it, and apply the same method by adding a small amount of dissolved powder.
2.3 Separated layers in nata de coco and grass jelly
Layer separation often happens when the first jelly layer is allowed to fully set and cool before the second layer is added. When this occurs, the surface of the first layer forms a smooth, glossy film that prevents the two layers from bonding. In addition, if the first layer becomes too cold or develops a thin layer of moisture on the surface (due to condensation in the refrigerator), the layers will not adhere properly and may separate when cut.
To prevent this, pour the next layer when the previous one has just started to set - when the surface is slightly firm but still warm and a little tacky. If the earlier layer has already hardened, gently score the surface with a toothpick or fork to create a slightly rough texture so the new layer can adhere better. It is also important to keep the remaining jelly mixture in the pot warm by heating it over the lowest heat while you continue layering the molds.
2.4 Proper storage for nata de coco and grass jelly
After pouring the jelly into molds, let it cool completely at room temperature before placing it in the refrigerator at an ideal temperature of 3°C - 5°C (37°F - 41°F). Avoid storing the jelly in the freezer, as freezing can cause it to become crumbly and release water once thawed. You should also cover the container tightly with a lid or plastic wrap to prevent the jelly from drying out or absorbing odors from other foods such as onions, garlic, meat, or fish.
Because homemade nata de coco and grass jelly contain no preservatives, it is best consumed within 2 - 3 days. The longer it is stored, the more likely it is to release water, which reduces its chewy texture and diminishes its naturally light sweetness.
3. Frequently asked questions about making nata de coco and grass jelly
When learning how to make nata de coco and grass jelly at home, many people often have questions about ingredients, mixing ratios, and preparation methods. Below are answers to some of the most common questions to help you feel more confident when making this dessert.
3.1 What is the ideal mixing ratio for jelly powder?
For grass jelly, you should follow the mixing ratio recommended by the manufacturer on the product packaging. For the coconut jelly layer, mix 1 pack of agar powder with 1.2 liters of fresh coconut water and 300 ml of coconut milk, or follow the detailed instructions provided on the package.
3.2 What is the difference between grass jelly and coconut jelly?
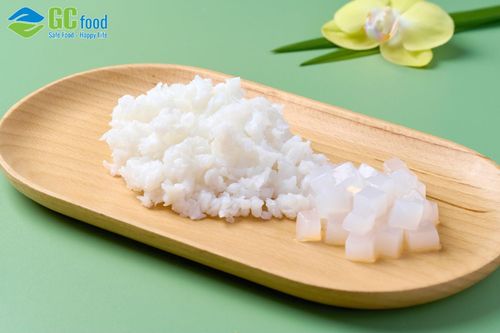
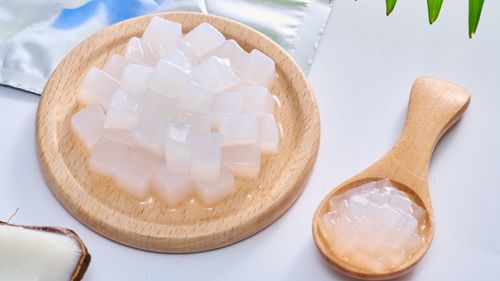
Grass jelly is derived from seaweed and typically has a milky white color, a smooth, soft texture, and natural cooling properties. Coconut jelly, on the other hand, is clear and translucent, with a distinctly chewy texture and a rich coconut aroma from fresh coconut water.
3.3 What toppings pair best with grass jelly?
For the best combination, consider using nata de coco produced by G.C Food Joint Stock Company (GC Food). GC Food nata de coco is processed using Pasteurization technology, which helps maintain its signature chewy texture and naturally refreshing taste. In addition, GC Food applies Aseptic UHT sterilization technology for export products, extending shelf life without the need for preservatives.

3.4 Can you add nata de coco directly into the jelly mixture while cooking?
Yes, you can add nata de coco topping to the jelly mixture after turning off the heat or while keeping it warm over very low heat. Simply stir gently so the nata de coco pieces distribute evenly throughout the mixture, then pour it into molds and allow it to cool following the usual process.
3.5 How can you check if the jelly is ready to set before pouring it into molds?
You can test the mixture by scooping a small amount of the jelly liquid onto a chilled plate to observe how quickly it sets. If the jelly firms up within about 30 seconds and reaches the desired chewy and firm texture, it is ready to be poured into molds.
With the nata de coco and grass jelly recipe above, you can confidently prepare this refreshing dessert at home for your family to enjoy. To make the dish even more complete with high-quality toppings, explore the range of internationally standardized nata de coco products on the GC Food introduction page.
Article compiled by Le Thi Anh Trinh - GC Food Communications Department, specializing in sharing in-depth knowledge about ingredients and production processes for aloe vera and nata de coco.